How To Expose For Interiors And Exteriors In Architecture Or Real Estate Photography - Part 2 - Post Processing
In Part 1, we explained the process of getting the proper exposures on location for architecture and real estate photography. Here in part 2, we explain how to post-process these exposures.
Now that you have your exposures as described in Part 1, pull them into Adobe Lightroom. Use the first three bracketed exposures, and make any adjustments you see fit, starting with white balance, where ‘Auto’ does a great job these days.
I’ll then usually pull the highlights down on the overexposed exposure, and sometimes I pull the shadows up in the underexposed frame, but not too much as that can introduce some noise. Be conservative with how much you open your shadows based on your camera and sensor. Now in the fourth exposure, the one in which you used the flash to expose for the outside scene, i’ll usually pull down the highlights just a bit so I can make out the details very well in the outside scene, and then I’ll open up the shadows about 30-50% to reveal a bit of details especially around the edges of the window frame or door frame. Often times if you hit the ‘auto’ tone button in Lightroom’s Develop pane, it’ll take care of a lot of this on its own and you could end up with a solid frame to use.
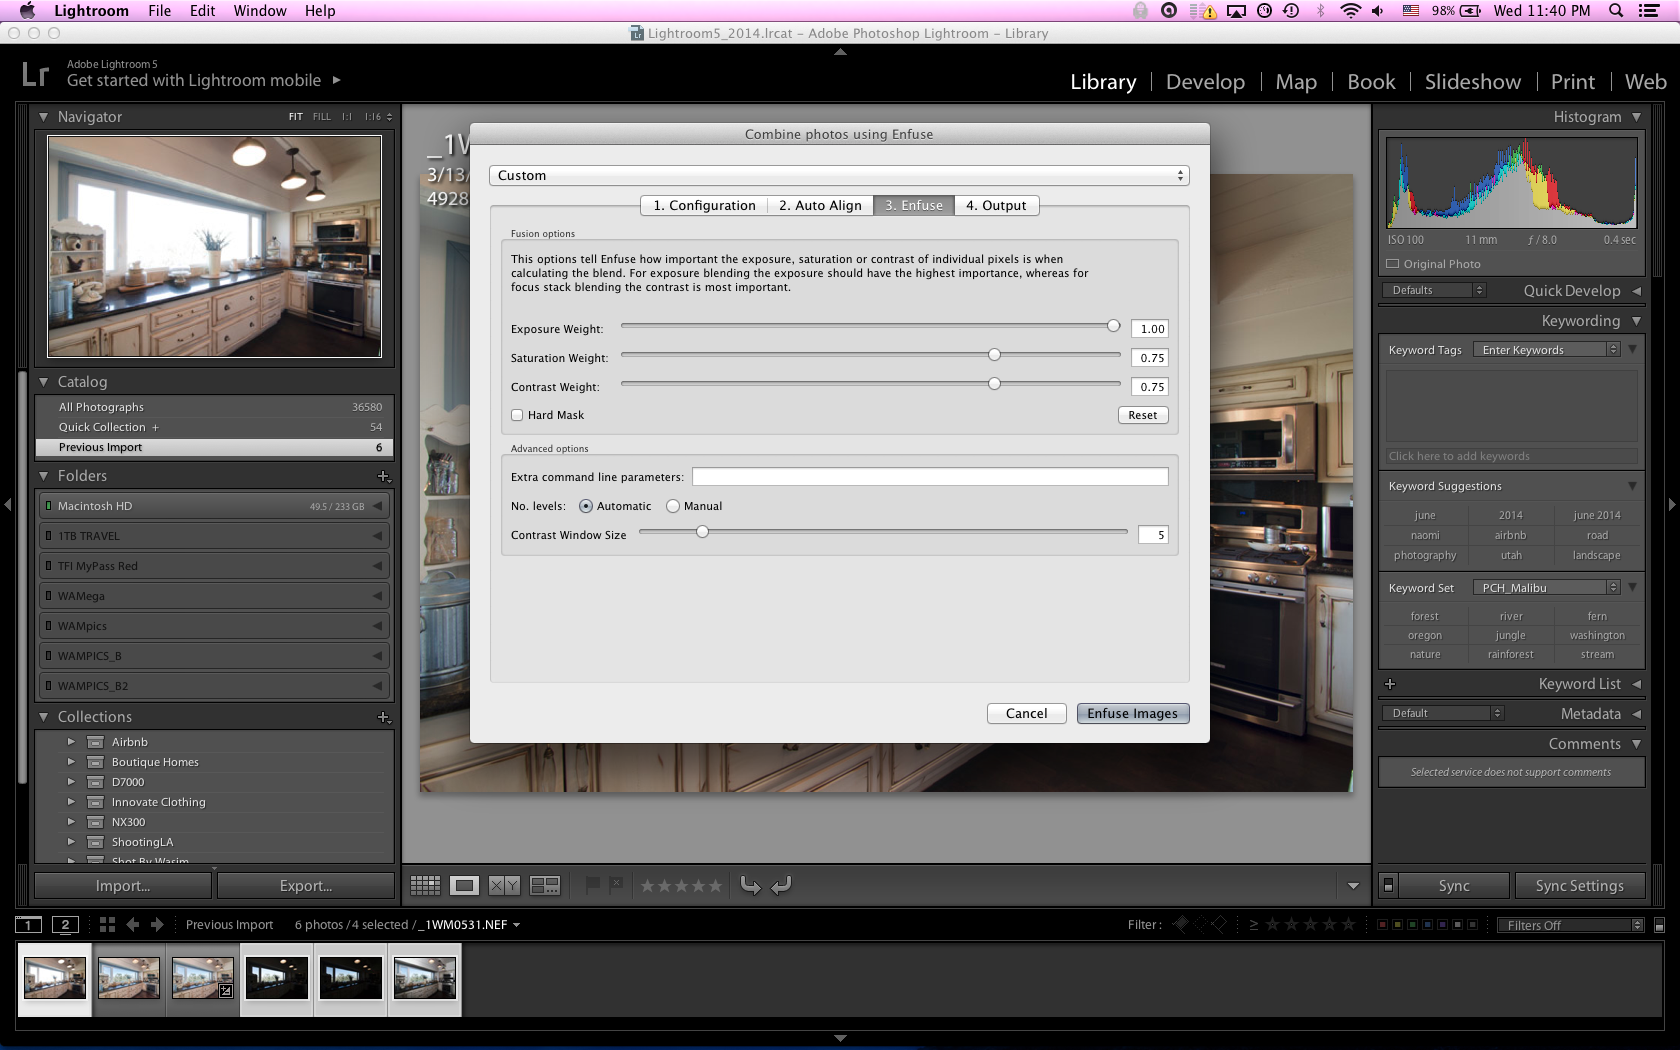
The next step is to highlight those exposures in Lightroom, and then navigate to ‘File' menu, to ‘Plug-In Extras' menu, to ‘Blend exposures using LR/Enfuse’. A dialogue box will pop up. Leave the "1. Configuration" panel the way it is, on the "2. Auto-Align” panel, if you used a tripod, be sure to un-check ‘Automatically align images.’ If you weren’t using a tripod, firstly, shame on you! Secondly, go ahead and click the ‘Automatically align images’ option. 3. The "3. Enfuse" panel is an important one. Using the default settings, the contrast and saturation will not normally work out very well for architecture and real estate photography. I have played with several settings and the ones in this screenshot seem to work best for me. Basically, I set 'exposure weight’ all the way up to 1, and both ‘saturation weight’ and ‘contrast weight’ are set up to .75. Lastly, in the “4. Output” panel, set where you’d like to file to be saved and other personal settings. I typically save to the same folder as the rest of the images in the current set I’m editing. Makes it easiest to find and know where it exists.
It’s worth mentioning here that, alternatively to Enfuse, once you’re comfortable and are looking for more control and fully-featured options, feel free to migrate to other HDR programs such as Aurora HDR, Photomatix. However, be aware, they are a bit more advanced and detailed and will take a bit more getting used to.
Additionally, as of the original date of this writing, Adobe has included an 'HDR Merge' feature directly in Lightroom that works extremely well. All you have to do is select the images you'd like to merge, right click, navigate to the 'Photo Merge' menu, and then choose 'HDR.' Click the 'Auto Align' checkbox, you can choose whether or not you'd like the 'Auto Tone' checkbox checked (if you check it, you'll get a good idea of what the balance will look like, but you can get the same effect by choosing 'auto' in the develop pane of Lightroom once the exposures are merged), and finally, choose 'none' for Deghost Amount. This will result in Lightroom outputting a merged image directly to the same Lightroom project you were working from.
If you choose to use Enfuse, here are screenshots of my settings:


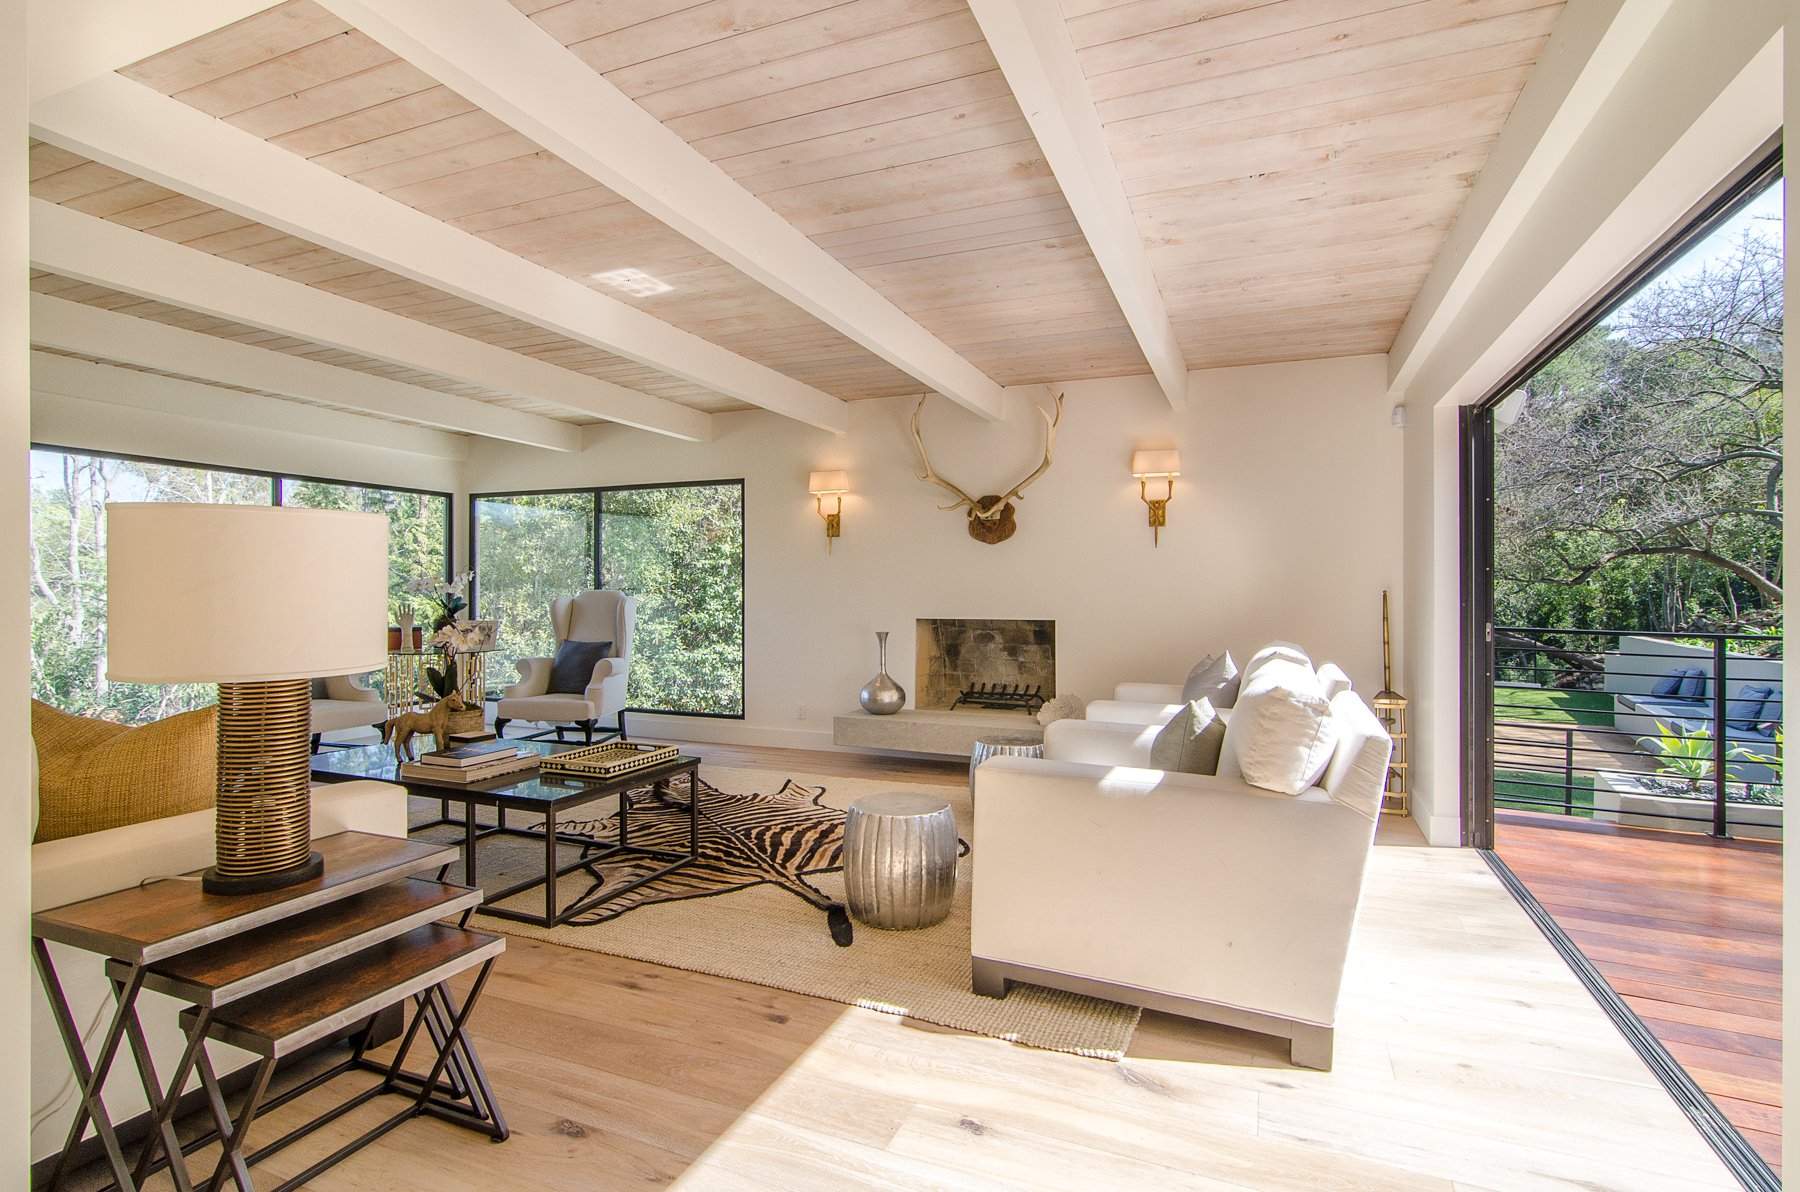
Now, once you have that file back into Lightroom, if done properly, what you’ll see is an image that has taken all the best exposed parts from the various exposures and fused them into one. This is the file that you can now process fully in Lightroom or Photoshop. I’ll usually adjust white balance, perhaps add some more contrast and clarity. I’ll drop highlights a bit until I feel the exterior scene is well balanced with the interior exposure and then, finally, I’ll add some sharpening. Here's the results of that:

If you want to go a bit further, there’s a wonderful plugin by DXO Software called Viveza. The beauty of this plugin is that it helps pull out a lot of detail and structure from the image, especially from a 3 exposure tif file, before tip-toeing the line of surreal HDR that you wouldn’t be able to do otherwise. If I want to go even further, I’ll often use the high-pass filter solution to add a tad extra controlled sharpening. That will turn the above enfused image into this:

Well, that’s it. I hope this helped you achieve better results with your interior and real estate photography. Once I got this process down, it certainly transformed my approach and results exponentially.
If you're interested, here are a few more entries that can also help you when shooting real estate and properties:
7 Tips for Shooting Real Estate Photography
How To Minimize Reflections In Interior Photography
5 Tips For Shooting Commercial Real Estate Photography
And if you’re in need of real estate photography services, whether commercial or residential, please feel free to contact me or check out my Property Photography website.
And if you’re just getting started here’s a great Beginner’s Guide to Architectural Photography provided by Pixpa.
For more of my madness: Instagram: @wasimofnazareth Twitter: @wasimofnazareth Google+: www.Google.com/+WasimMuklashy Facebook: www.Facebook.com/WasimOfNazareth